October 05, 2024, 01:42:02 PM

Show Posts

This section allows you to view all posts made by this member. Note that you can only see posts made in areas you currently have access to.


Messages - Kudi Nepal Di

Pages: 1 ... 79 80 81 82 83 [84] 85 86 87 88 89 ... 339
1661
Gup Shup / Re: Answer of ur all Question my dear PUNJABIO
« on: December 14, 2010, 05:25:33 AM »
pata nhi rab he janda... Ethe bahut vari kuriye de bare topic bande ne...
Mainu gusa ohnda bahut vari but baki mera ta hasde  hunde c... Ik vari meri fight vi hoyi ethe ik munde nal fir vi kuch nhi change hoya... Anyways mai ik gal hor kehni aa jehre loki kuriya nu galla kade ta ohna te buri akh rakhde (rape) oh kyu bhul jande aa ki ohnde ghare vi kuriya ne?

Je aiwe kehde aa ki tera ghare maa ja bhena nhi fir kida gusa lagda.. Ena nu kina vi sochna chaida ki sanu kida feel hunda


1662
Shayari / Re: Rap - Pj Gabrus
« on: December 14, 2010, 04:34:17 AM »
i know ma hun tym dekha :sad: chalo better luk next tym :Laugh:

1663
Help & Suggestions / Re: Question 2 - PJ Pari's should have new color
« on: December 14, 2010, 04:30:50 AM »
kise nhi suni tuhadi gal kyu ki pj diya kuriya gulabo banya bahut att lagdi aa

1664
Shayari / Re: Rap - Pj Gabrus
« on: December 14, 2010, 04:27:08 AM »
:he: kida ki karin :excited:

1665
Shayari / Re: Rap - Pj Gabrus
« on: December 14, 2010, 04:17:01 AM »
haha tamlu vi shayeri vich att kari janda pata nhi aa hor ki ki kari janda :laugh:

1666
Cars / Re: Awww..Cute
« on: December 14, 2010, 02:59:17 AM »
chori karnu dil karda happy0045

1667
Shayari / Re: INSAAN???????
« on: December 14, 2010, 02:58:04 AM »
awesome

1668
Gup Shup / Re: Answer of ur all Question my dear PUNJABIO
« on: December 14, 2010, 02:37:49 AM »
ik gal note karo lyf vich jehra bande duj nu bura kehda hai oh aap vi ohva da hunda hai.. Ta he ta duj nu us tharah kehda loki pehla apne pari thale soti mar ae fir keha kuch ki app oh kina thik aa.. Je oh punjaban nu bura kehde aa.. Ta oh di vi mum n sis vich he ohde aa..
Hum na change bura na koi..
Je kisnu gusa laga ta mai sry mangdi hai par aa gal ik dam sach hai

Dhanwad

1669
Pics / Re: For Desi Kaur Cutie
« on: December 14, 2010, 02:23:16 AM »
hi mai mar java kini sharif cat aa mera vargi.. Thx kg sis :hug: :love: sada dil garden garden ho gaya

1670
PJ Games / Re: PJ Award 2010
« on: December 14, 2010, 02:16:06 AM »
Quote
1) Purash teh Janeem deyia vota alag alag ketiya javan geyia

:hehe: kina sohna likha mai aa naam pehli vari suna :Laugh:

Amlu u must write category in punjabi too :laugh: i mean pure punjabi

1671
Tutorials / Re: How to Paint a Surreal Scene in Photoshop
« on: December 14, 2010, 12:36:06 AM »
final i have done it.... chaloo karoo comments start hun....  :excited: :excited:

1672
Tutorials / Re: How to Paint a Surreal Scene in Photoshop
« on: December 14, 2010, 12:33:19 AM »
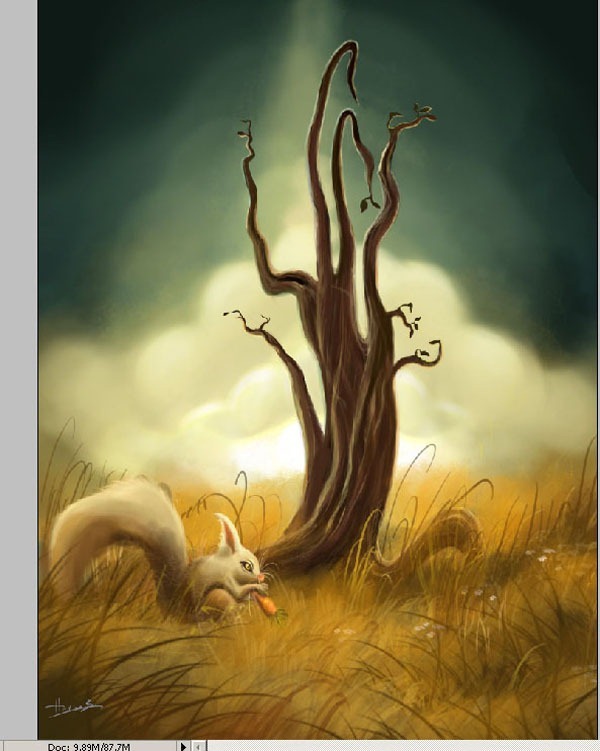
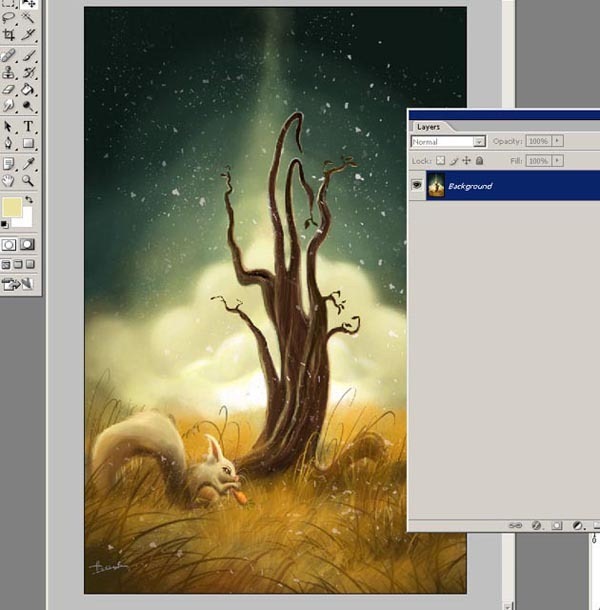
Step 21 – Finishing touches

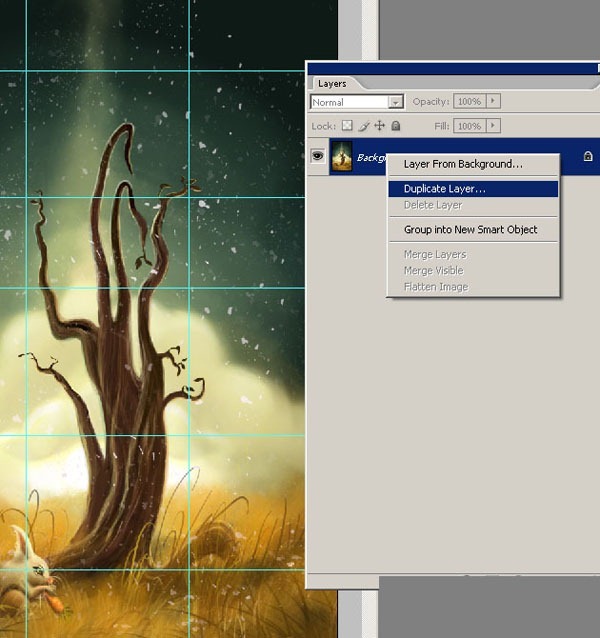
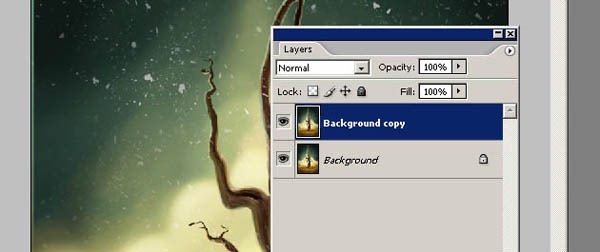
Right click the layer and choose Duplicate Layer.


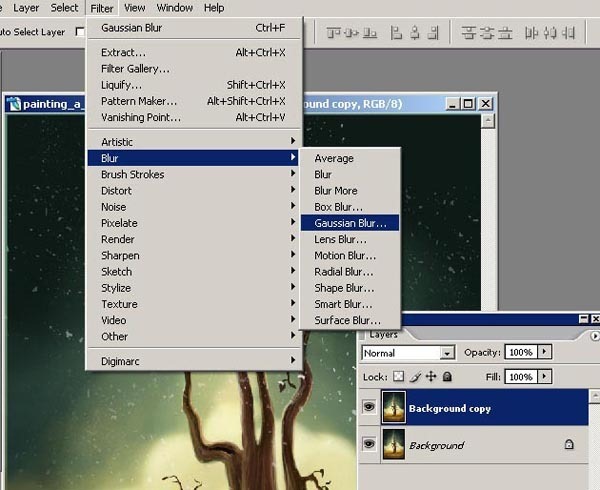
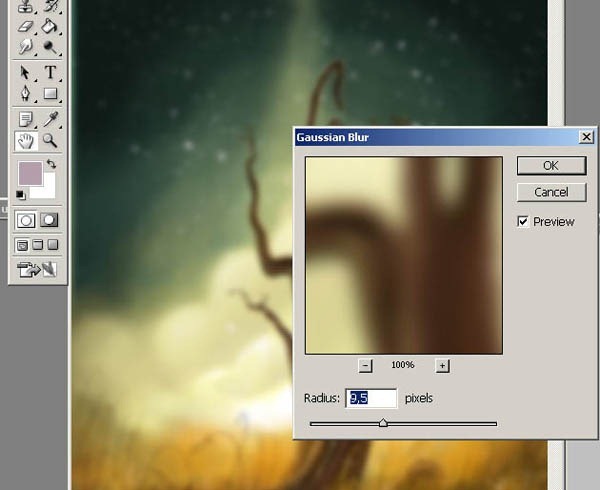
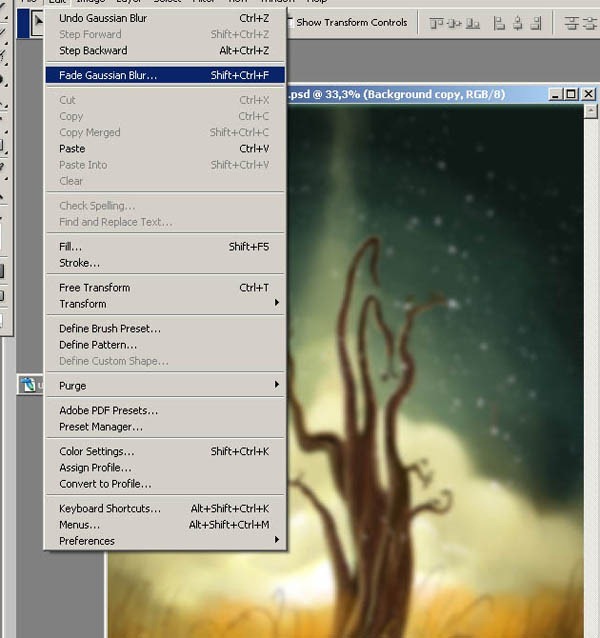
Working on the “copy” layer, blur (Filter > Blur > Gaussian Blur) and set the Blur Radius to 9.5.


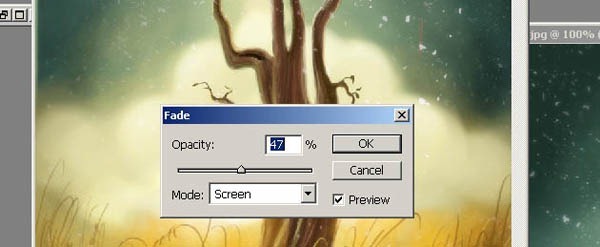
Now use Fade Gaussian Blur (Edit > Fade Gaussian Blur). Set the Opacity to 47% and the Mode to “Screen.”


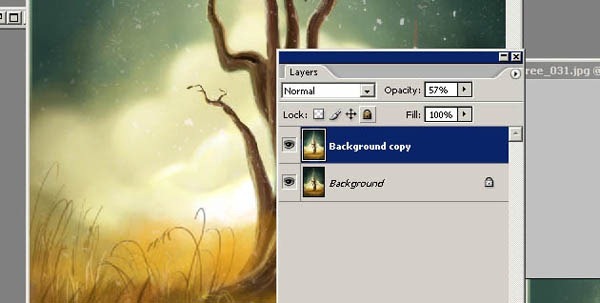
In the Layers palette, still working on the “copy” layer, use the following settings:

    * Opacity: 57%
    * Fill: 100%


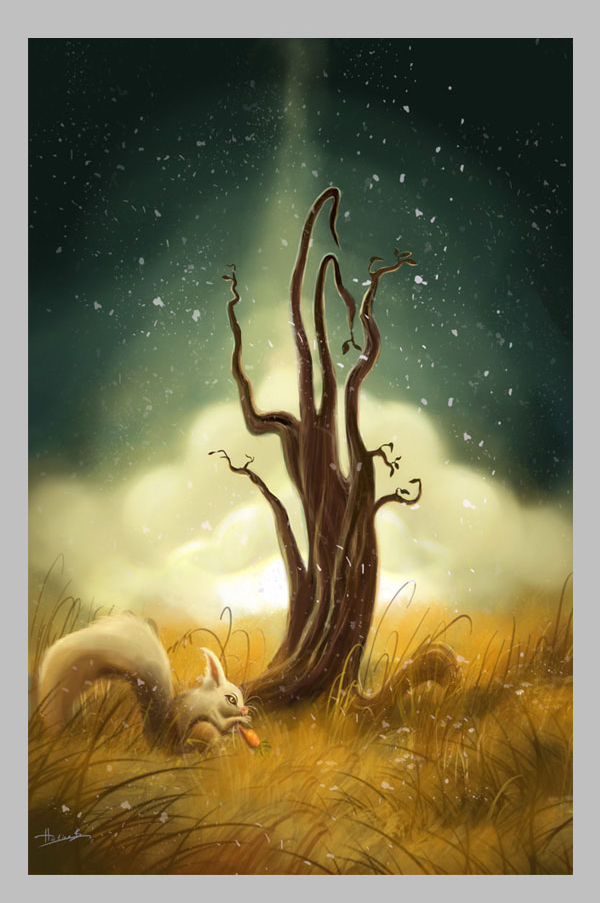
Final Results


1673
Tutorials / Re: How to Paint a Surreal Scene in Photoshop
« on: December 14, 2010, 12:29:31 AM »
Step 18 – Adding foreground

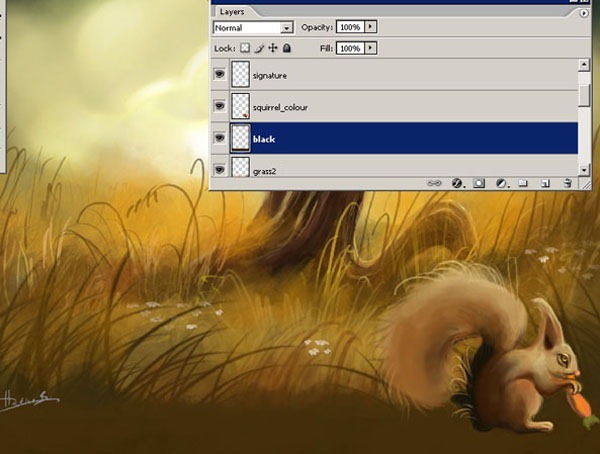
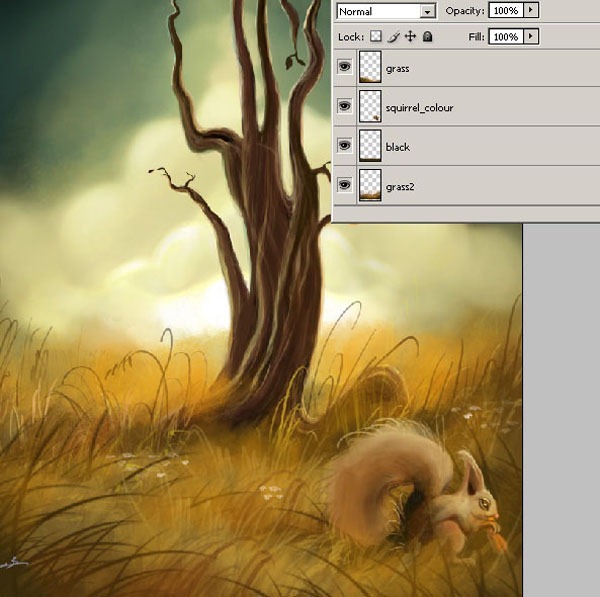
To make the squirrel appear to be in the midst of the grass, I changed the canvas size again. I increased the height of the canvas by adding extra space to the bottom of the painting. Create a new layer and label it “black.” Give it a dark brown colour.


Use the Brush Tool to add some grass to this layer or copy the “grass” layer and paste it on top of the “squirrel_colour” layer.


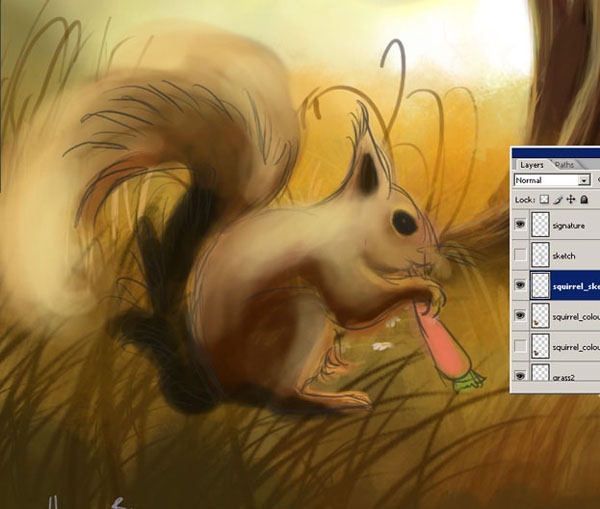
Step 19 – Detailing the squirrel

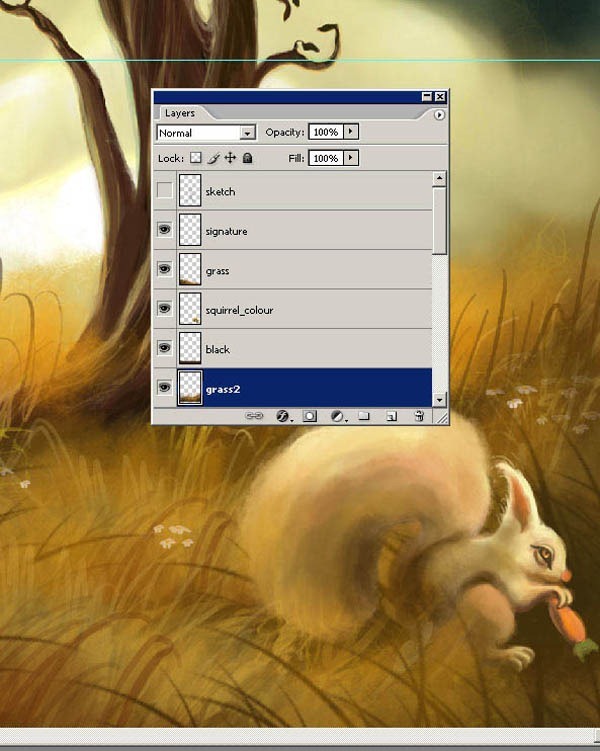
Give the squirrel some more details and paint it white. Use the Smudge Tool to smooth the squirrel out. Use the Burn Tool to add some shadows.


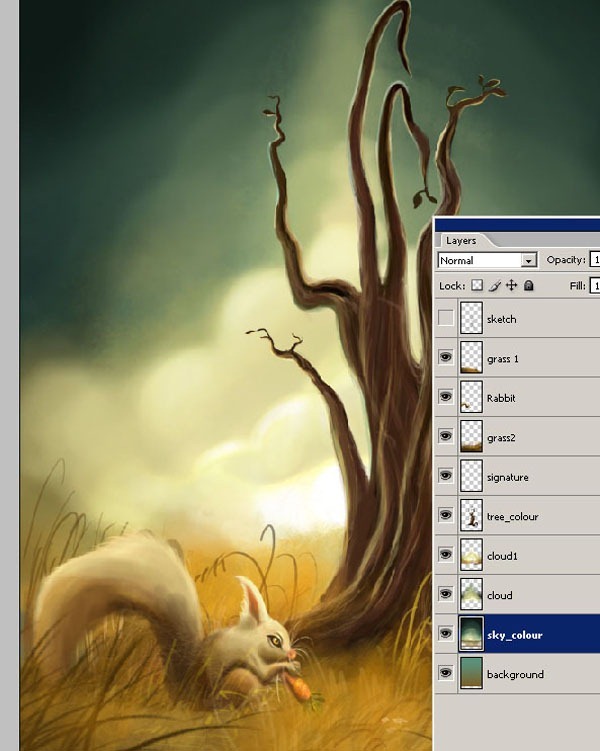
The drawing actually looks more like rabbit, so rename everything that says “squirrel” to “rabbit.” Move the rabbit over to the left, as it looks better in that position. I also repositioned the “sky_colour” layer.


Your painting should now look like this.


Step 20 – Backing up a copy

Save a copy of your painting as a psd file. Merge the files and save as another copy.


1674
Tutorials / Re: How to Paint a Surreal Scene in Photoshop
« on: December 14, 2010, 12:23:08 AM »
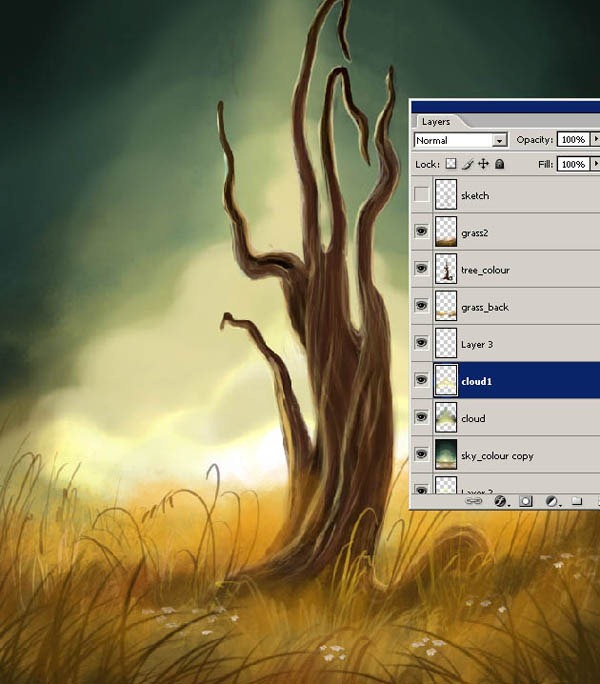
Step 15 – Painting clouds

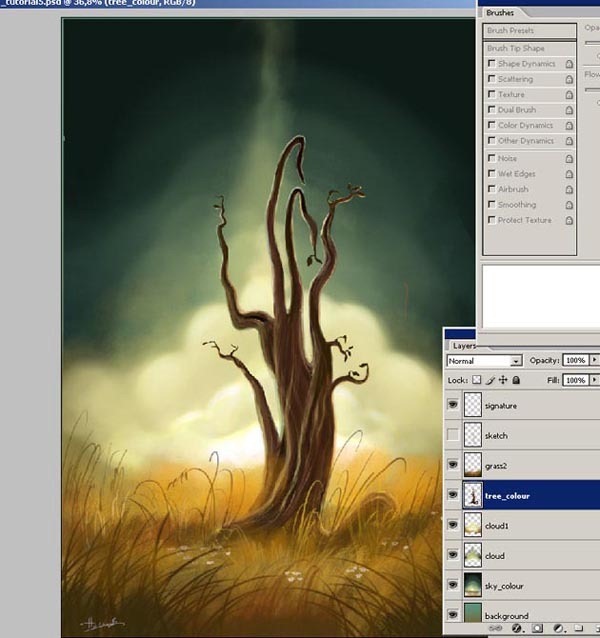
Create a new layer labelled “clouds” above the “sky_colour” layer. Paint some clouds.


Create another layer labelled “clouds1” to add more depth to the clouds.


Step 16 – Adding leaves

Select the “tree_colour” layer and draw some leaves on the branches.


Your painting should now look like this.


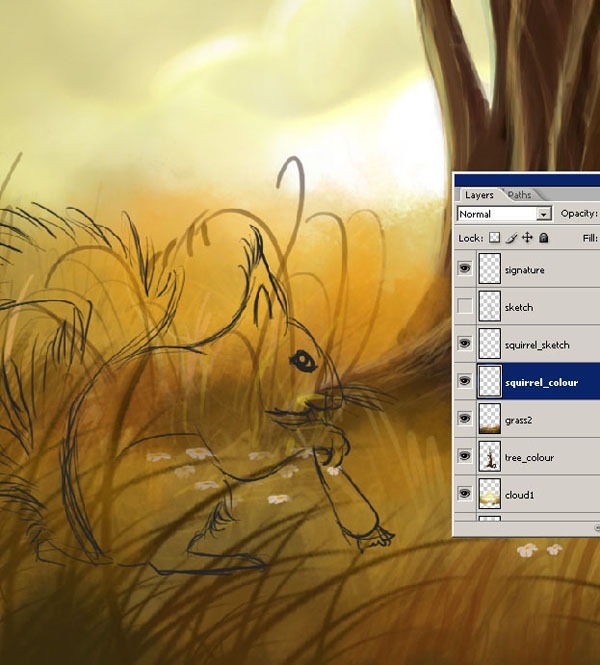
Step 17 – Painting the animal character

If you deleted the “squirrel_sketch” layer and saved it in another file, now is the time to bring it back. Add it to your Layer palette.


Create a new layer labelled “squirrel_colour” and start painting over it. You may need to change colours and delete strokes as you go.


1675
Forum Dehshiyat / Rules Regulations / Re: Pj Team
« on: December 14, 2010, 12:15:31 AM »
:scared: :omg: :hehe: :hehe: :hehe: :hehe:

 :spam: :spam: ja na manooo  :angr: :angr:

1676
Tutorials / Re: How to Paint a Surreal Scene in Photoshop
« on: December 14, 2010, 12:14:48 AM »
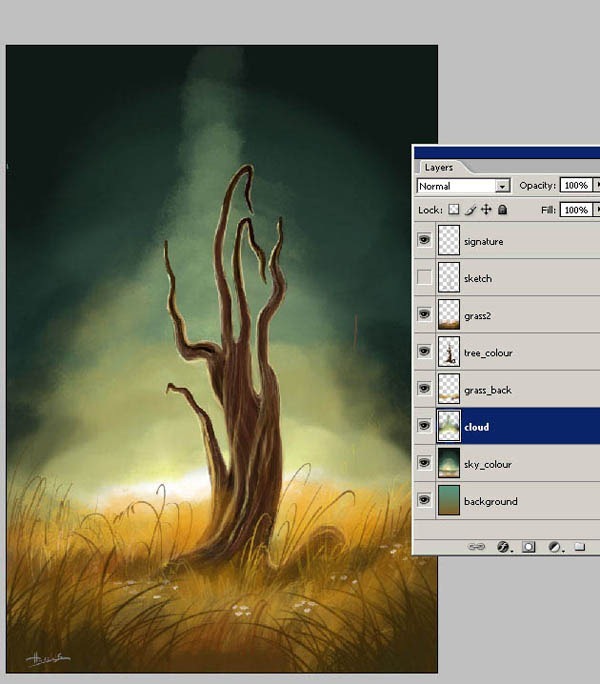
Step 13 – Adding grass around the tree

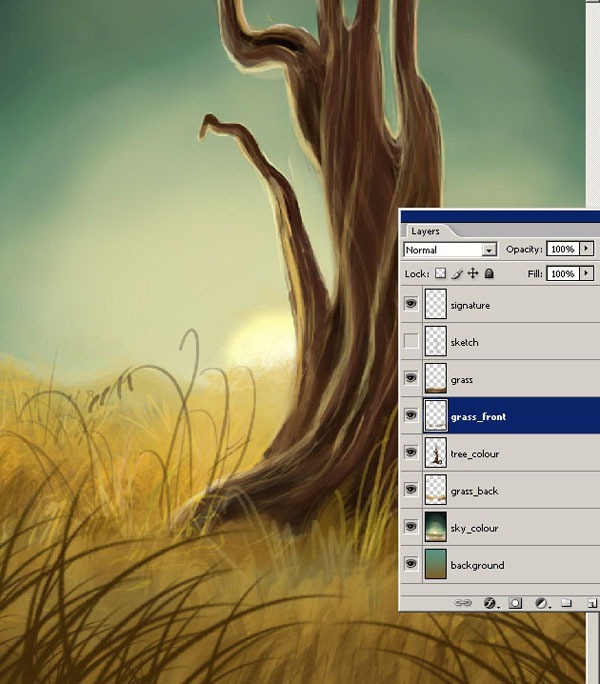
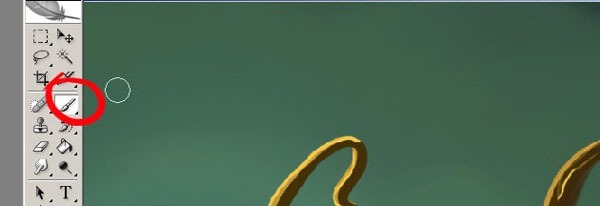
Create another layer labelled “grass_back” under the “tree_colour” layer. Then use the Brush Tool to add some grass behind the tree. Use some greens and yellows. They do not need to be the same colour.


Create another layer labelled “grass_front” above the “tree_colour” layer but below the first “grass” layer that you created in step 11. Use the Brush Tool to paint some grass in front of the tree. Use some greens and yellows. They do not need to be the same colour.


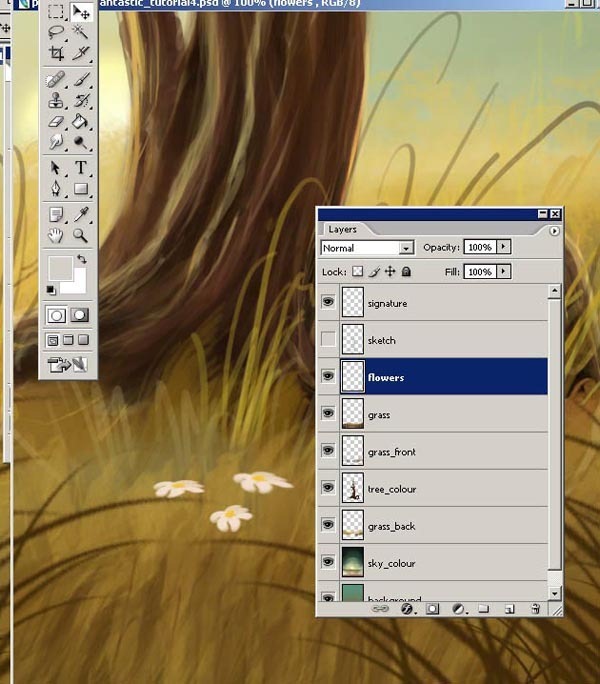
Step 14 – Painting Flowers

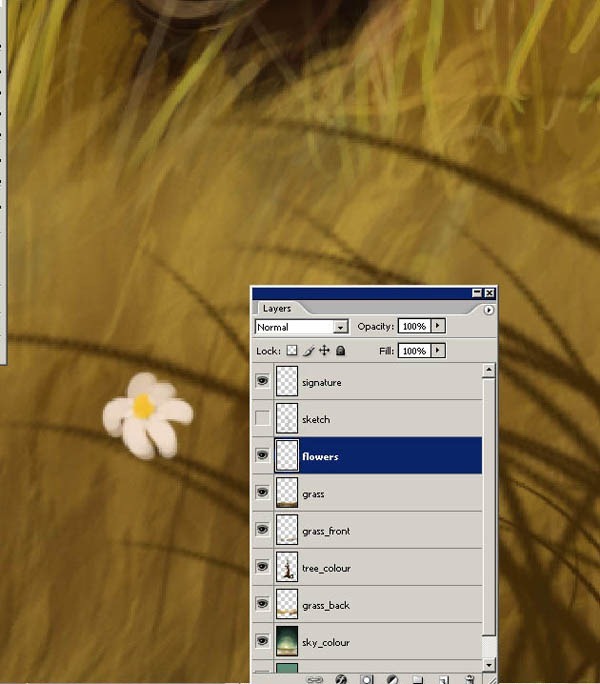
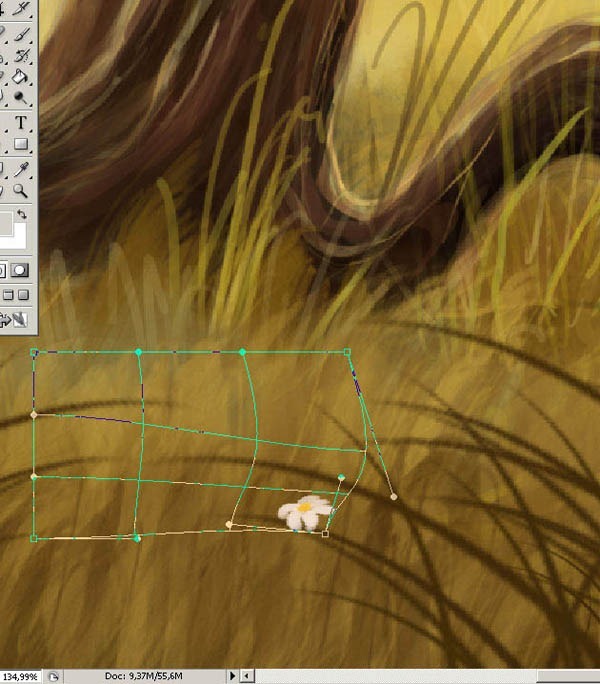
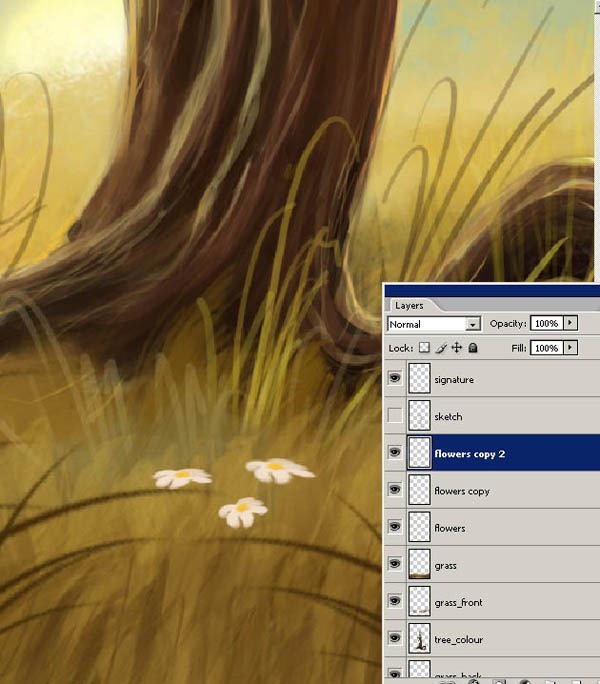
Create another layer labelled “flowers” and paint a flower among the grass.


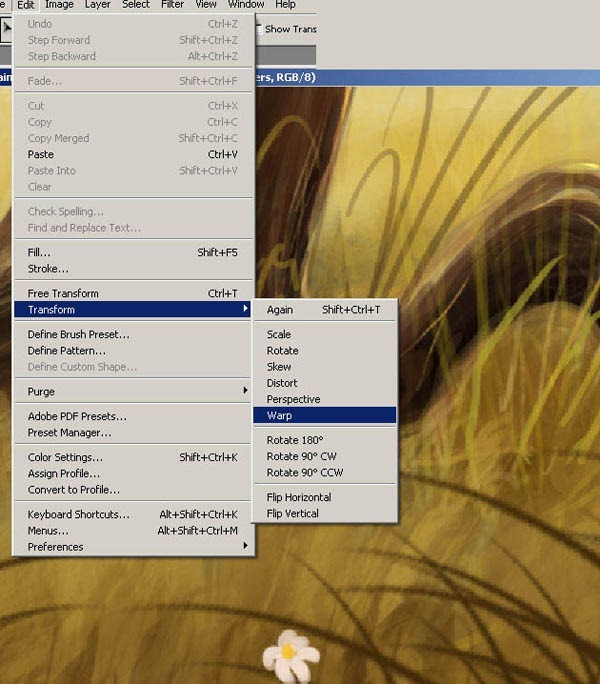
Then warp the flower (Edit > Transform > Warp) like the image below.


Copy the flower (left click + right click or Alt Gr) and place it around the grass.


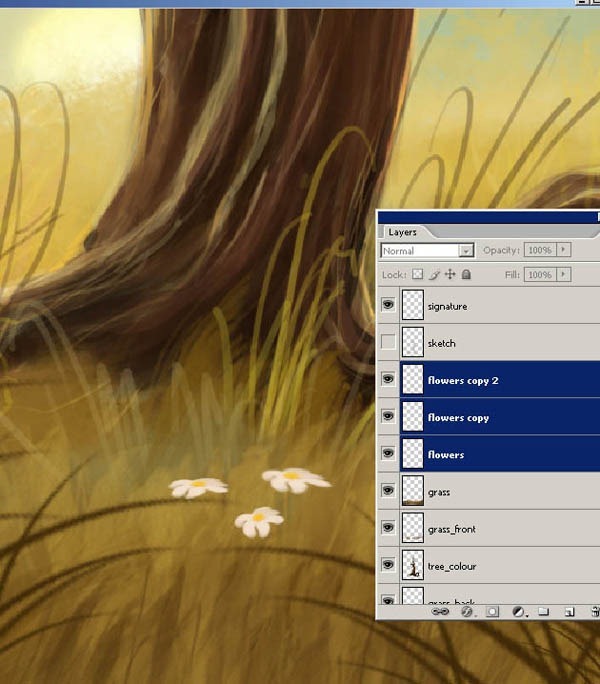
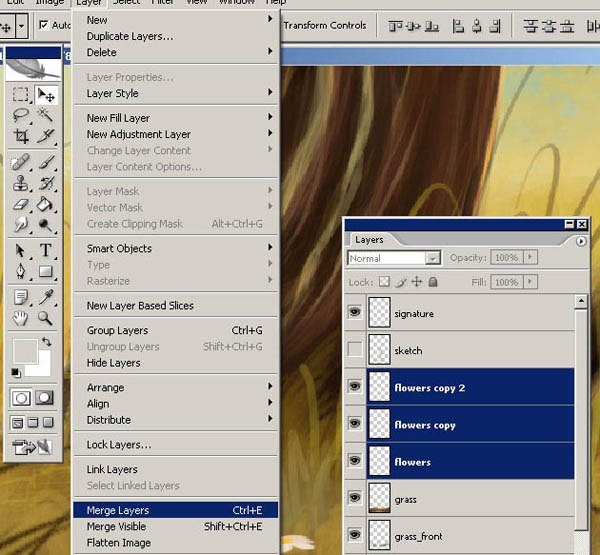
Select the three flower layers (shift + click) and merge (Layer > Merge Layers or Ctrl+E) the three layers together.


You should now have only one layer for the flowers.


1677
Tutorials / Re: How to Paint a Surreal Scene in Photoshop
« on: December 14, 2010, 12:06:03 AM »
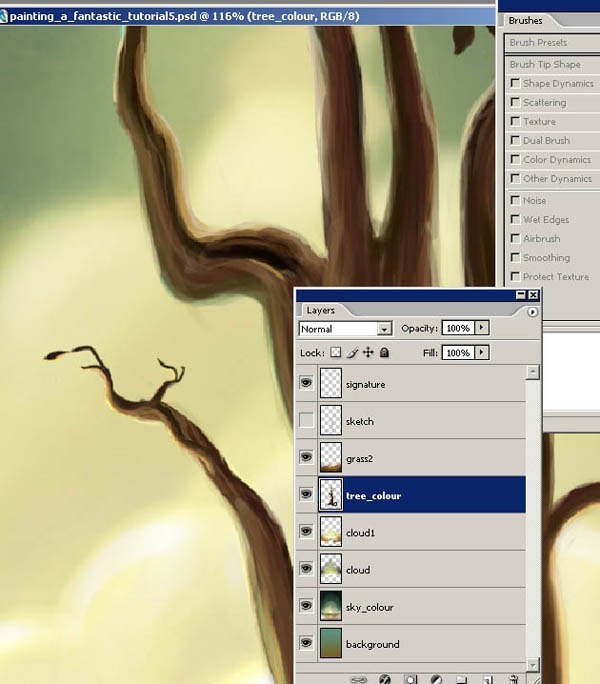
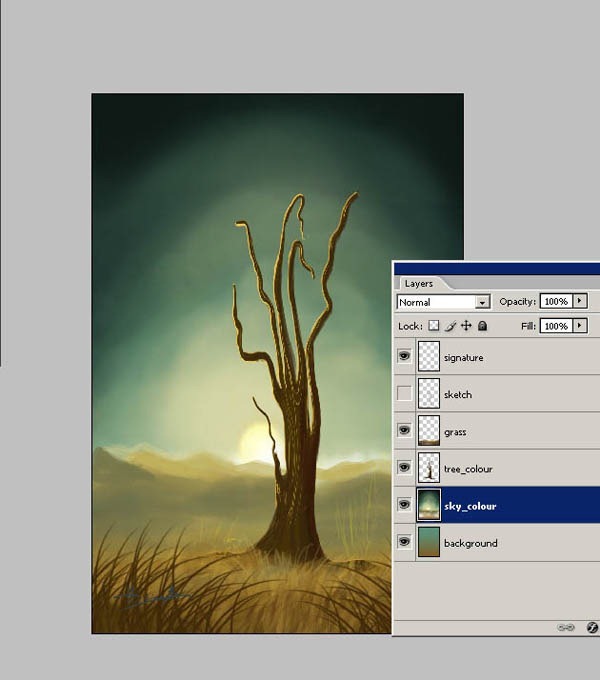
Step 10 – Adding light on the tree

Still working on the “tree_colour” layer, add some light colours to some of the edges on the tree. Remember where you have positioned the sun and add the highlights accordingly.


Step 11 – Adding grass

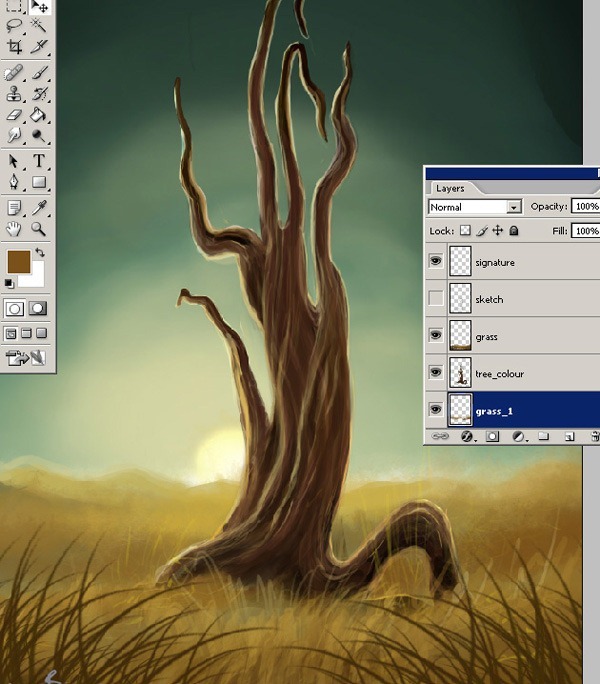
Create a new layer and name it “grass.” Select the Brush Tool and use a green colour.


Right click on the canvas. When the Brush Setting window pops up, select the brush tip that looks like grass (112).


Draw some grass in front of the tree.


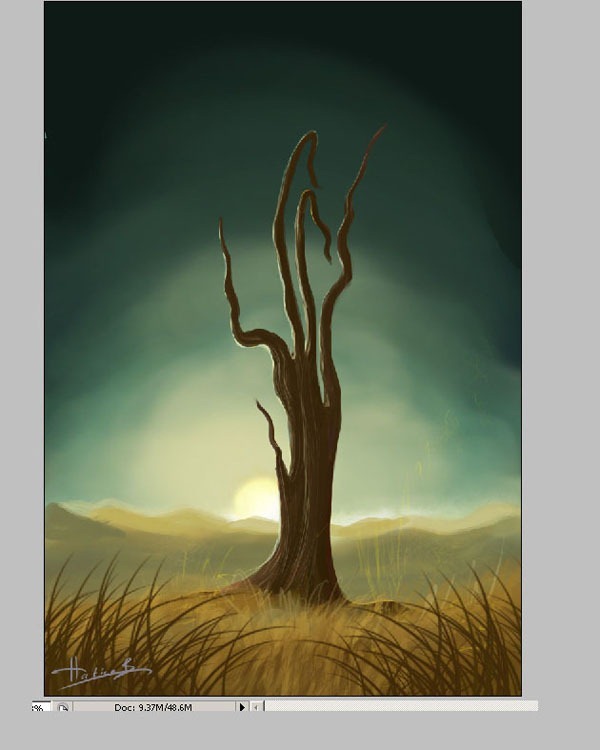
Step 12 – Detailing the tree

Hide your “sky_colour” layer so that it doesn’t distract you. Select the Dodge Tool and add some light to the tree. Add other details like the grains and the uneven light on the bark.


Your painting should now look like this.


If you like, you can delete parts of the branches so that it looks more realistic. I also created a greater contrast on the tree by adding more dark tones to one side and light tones to the other side.

1678
Tutorials / Re: How to Paint a Surreal Scene in Photoshop
« on: December 13, 2010, 11:59:32 PM »

Step 6 – Filling in the background

Select the layer labelled “background.” Then select the Gradient Tool and fill the canvas as shown below.


Step 7 – Adding the sky

Create two more layers and label it “sky_colour” and “tree_colour.” As you can see below, I’ve deleted the “squirrel_sketch” layer. I have saved the sketch into a different psd file to work with later. Now select the “tree_colour” layer and roughly paint the tree brown. Then select the “sky_colour” layer and roughly paint the sky.


Add some more shadows to the “sky_colour” label. Create a layer labelled “sun” and paint a sun behind the tree.


Step 8 – Change the canvas size

To add more detail to the painting, you need a bigger canvas. So change the Image Size (Image > Image Size) to the following settings.

    * Width: 1500px
    * Height: 2222px
    * Resolution: 300


Step 9 – Quick detailing on the tree

Set the opacity of the “sketch” layer to 42% so that it doesn’t interfere with your painting. Select the “tree_colour” layer and add some more colour to your tree...


Hide the “sky_colour” layer so you can better work on your tree. Add some more detailing to the branches.


1679
Forum Dehshiyat / Rules Regulations / Re: Pj Team
« on: December 13, 2010, 11:55:03 PM »
desi teri billi boxing bahut vadiya khel di ah  :pagel:

tuise boxin karnii....

 
so cute :hehe:

kon mai je topic :laugh:


Bachee topic da naam change karke kuch hor rakh davo. aa ke gal hoye - PJ Team? :)

- Chette naam badal ke kuch hor rakho nai teh desi nu keh ke thuda topic lock kara denna.. lol


kehra rakha vasia desi ne he topic create kita  :laugh: :laugh: :laugh:


:hihpanga: :hihpanga: :hihpanga: :hihpanga: :hihpanga: :hihpanga: naa assi ta emotion hi paunne a
karlo jo karna
assi hun toh ta jithe likhan nu v jee karo othe v emotion paa k chadiyia karne a post

aa gal nhi changiii jaz mitra  :sad: :sad:

1680
PJ Games / Re: PJ Award 2010
« on: December 13, 2010, 11:40:17 PM »
 :excited: :excited: :excited: i love diz topic may be sada naam vi aa jauu ethe :hehe:

Pages: 1 ... 79 80 81 82 83 [84] 85 86 87 88 89 ... 339