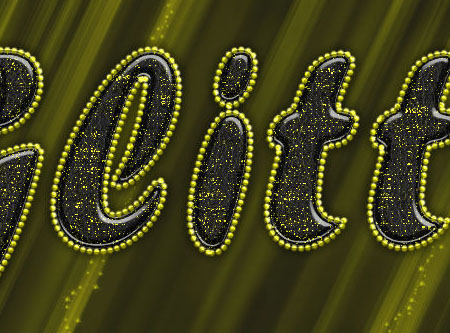
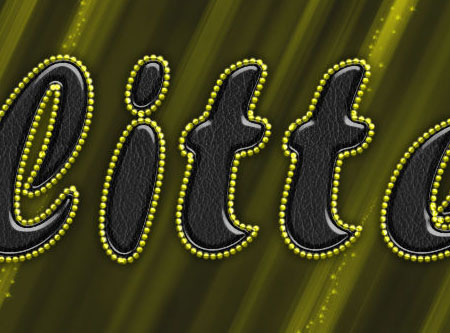
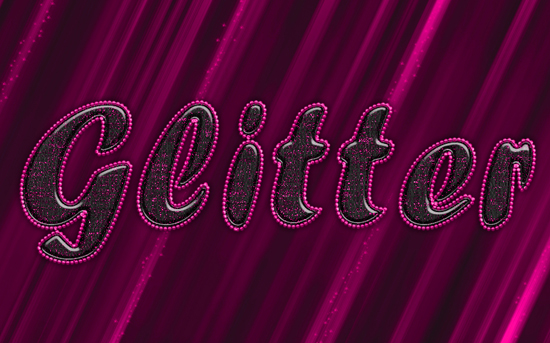
October 05, 2024, 12:37:53 PM

Show Posts

This section allows you to view all posts made by this member. Note that you can only see posts made in areas you currently have access to.


Messages - Kudi Nepal Di

Pages: 1 ... 75 76 77 78 79 [80] 81 82 83 84 85 ... 339
1581
Lok Virsa Pehchaan / Re: Sita Devi of Kapurthala
« on: January 01, 2011, 12:37:14 AM »
r u from kapurtala ???

no.... mera kam history add karna bas...

1582
Lok Virsa Pehchaan / 35 Akkhri!!!
« on: January 01, 2011, 12:34:20 AM »

1583
Lok Virsa Pehchaan / Re: Funnjaab!!!
« on: January 01, 2011, 12:33:36 AM »
nach changa laindi kitho sikhiya :excited:

punjabi nu shuru tooo he aunda hunda...  :excited:

1584
Lok Virsa Pehchaan / Re: Sita Devi of Kapurthala
« on: January 01, 2011, 12:30:12 AM »
dhanwad mitroooo

1585
Lok Virsa Pehchaan / Re: Funnjaab!!!
« on: January 01, 2011, 12:28:06 AM »
funjaaaabi  :omg:
haan  :balle: :balle:

1586
Lok Virsa Pehchaan / Re: * Prince of Kapurthala - 1882 **
« on: January 01, 2011, 12:25:48 AM »

1587
Tutorials / Re: How to Paint a Surreal Scene in Photoshop
« on: January 01, 2011, 12:23:08 AM »
i got so much information from ur topics like upload pic and all thx very much

ur welcome

1588
Tutorials / Re: Glittering Text Effect
« on: January 01, 2011, 12:22:51 AM »
done hun shuru karooo comments  :excited: :excited:

1589
Tutorials / Re: Glittering Text Effect
« on: January 01, 2011, 12:20:06 AM »
Step 8:

- Create a new layer between the two text layers (the original and the copy), call the new layer “Glitter Sparkles”, and change its Blend Mode to Vivid Light. Ctrl + Click on one of the text layers’ thumbnail to create a selection


Set the Foreground color to #575525 and the Background color to #fbfcb2. Make sure the “Glitter Sparkles” layer is selected, and fill the selection with the Foreground color.

Then, go to Filter -> Render -> Fibers. Type in 15 for Variance, and 50 for Strength.


- Go to Filter -> Texture -> Stained Glass. Change the Cell Size to 2, the Border Thickness to 1, and the Light Intensity to 3.


- Go to Filter -> Distort -> Wave. Change the values as shown below...


When you press OK, you should get the final effect.


Step 9:

We are going to add a Hue/Saturation adjustment layer on top of all the layers. Change the Saturation value to +50. This will make the colors more vivid. You can also change the Hue value to change the color.


This is the final result once again.


1590
Tutorials / Re: Glittering Text Effect
« on: January 01, 2011, 12:15:45 AM »

Step 5:

Now, double click on the DUPLICATED text layer to add the following styles:

- Drop Shadow. Change the Distance to 0, and the Size to 13


- Inner Shadow. Change the Blend Mode color to #868686, the Distance to 0, and the Size to 10.


- Bevel and Emboss. Change the Size to 9, remove the check next to Use Global Light, change the Angle to 70 and the Altitude to 20. Choose the Notched Slope as the Gloss Contour, check the Anti-aliased box, and change the Shadow Mode color to #737373.


- Use Ring – Triple for the Contour.


You should end up with something similar to this:


Step 6:

- Right click on any of the text layers and choose Create Work Path.


- Open the BRUSH palette again, and this time, choose a normal hard brush. Change the Size to 6px, and the Spacing to 115%. Remove any other attributes.

Create a new layer on top of all the layers, and call it “Brush Stroke”.


 Still selecting the brush, change the Foreground color to #fff43e, then place the cursor somewhere near the work path and hit Enter. This will stroke the workpath using the brush.

Press Ctrl + H to get rid of the workpath.


Step 7:

Double click on the “Brush Stroke” layer to apply the following styles:

- Drop Shadow. Change the Distance to 0, and the Size to 13.


- Inner Glow. Change the Blend Mode to Overlay, and the color to #fff43e.


- Bevel and Emboss. Remove the check next to Use Global Light, change the Angle to 70 and the Altitude to 20. Choose Valley – High as the Gloss Contour, check the Anti-aliased box, and change the Shadow Mode color to #737373.


- Use Peaks for the Contour.


- Gradient Overlay. Change the Blend Mode to Soft Light, and the Angle to 90.


This should make the border beveled and a little bit shiny.


1591
Tutorials / Re: How to upload picture from our pc on pj?
« on: January 01, 2011, 12:05:31 AM »
ur welcome  =D> =D>

1592
Tutorials / Re: How to Paint a Surreal Scene in Photoshop
« on: January 01, 2011, 12:04:37 AM »
thx mate

1594
Tutorials / Re: How to off PM notify??
« on: January 01, 2011, 12:02:09 AM »

1596
Tutorials / Re: How to off comment notify??
« on: December 31, 2010, 11:59:33 PM »

1597
Tutorials / Re: how to find your uploaded files??
« on: December 31, 2010, 11:58:15 PM »
ur welcome

1598
Tutorials / Re: how to use forum
« on: December 31, 2010, 11:54:42 PM »
:waitin:
:angr: :angr: smiley not only :angr:

1599
Tutorials / Re: May be itz more helpin for new user?
« on: December 31, 2010, 11:52:49 PM »

1600
Tutorials / Glittering Text Effect
« on: December 30, 2010, 12:42:25 AM »
The Final Result:


Step 1:

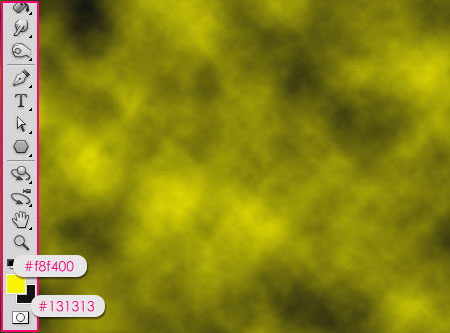
- Set the Foreground color to #f8f400, and the Background color to #131313. Then go to Filter -> Render -> Clouds.


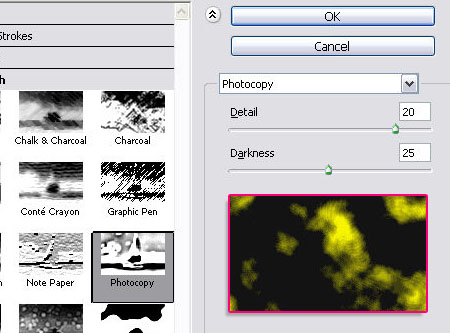
- Go to Filter -> Sketch -> Photocopy. Set the Detail value to 20, and the Darkness value to 25.


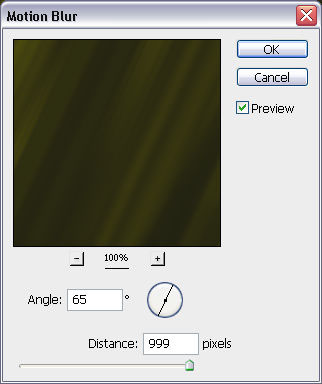
- Go to Filter -> Blur -> Motion Blur. Set the Angle value to 65, and the Distance value to its maximum (999).


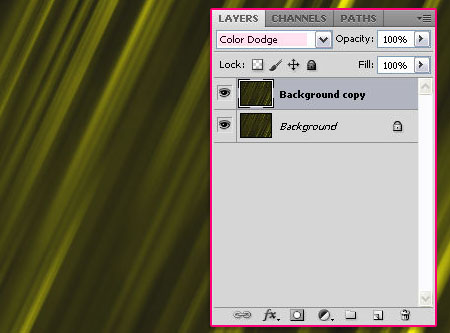
 Go back to your document, duplicate the “Background” layer, and change the copy’s Blend Mode to Color Dodge.


Step 2:

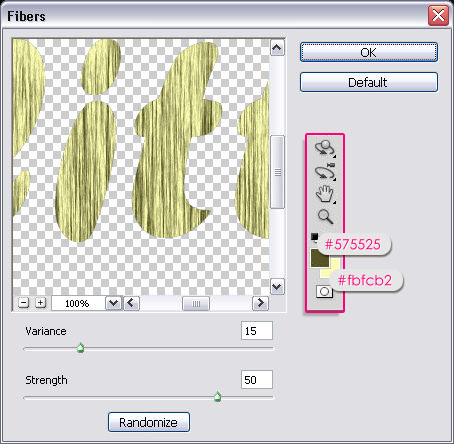
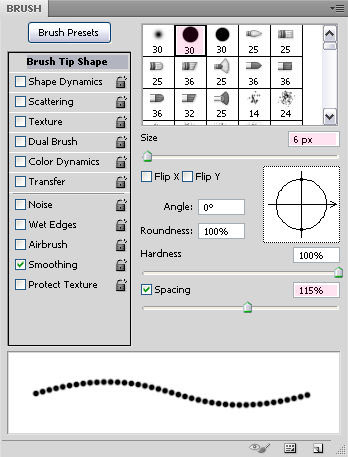
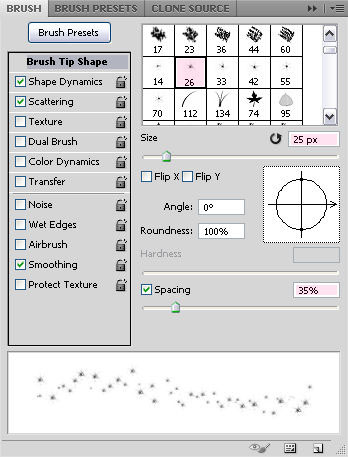
- Open the Brush Palette (Window -> Brush). From the Brush Tip Shape tab choose one of the sparkly brushes available, change its size to something around 25px, and change the Spacing to 35%.


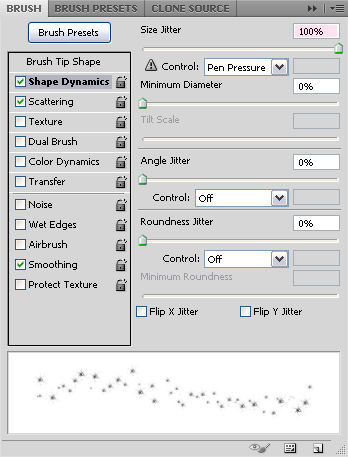
 Under the Shape Dynamics, change the Size Jitter to 100%.


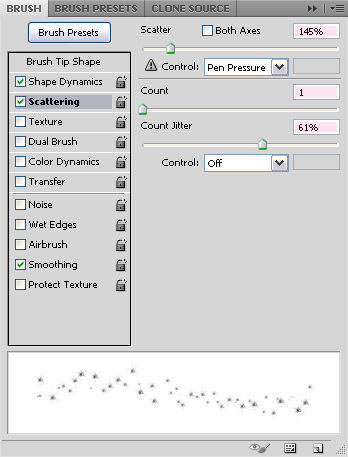
- Under the Scattering, change the Scatter to 145%, the Count to 1, and the Count Jitter to 61%.


Step 3:

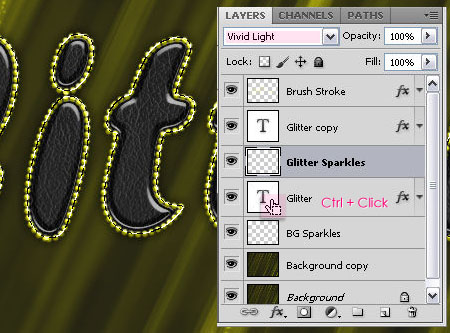
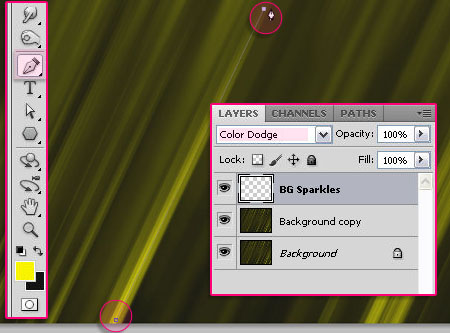
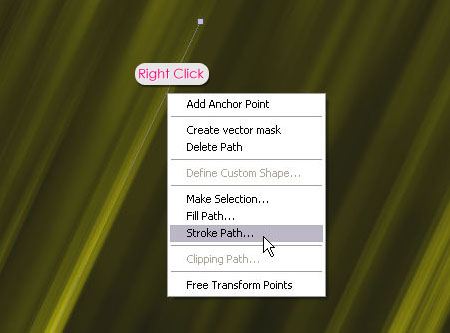
- Create a new layer and call it “BG Sparkles”, change its Blend Mode to Color Dodge. Then, grab the Pen Tool, and draw a line (by clicking where you want it to start and where you want it to end). It is better to draw the line over the glowing areas in the background


 Make sure that the “BG Sparkles” layer is selected, then right click on the line (path) you created, and choose Stroke Path.


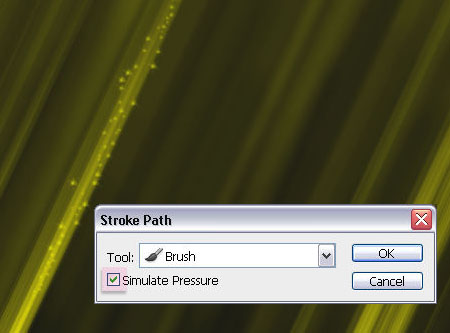
Choose Brush from the Tool drop down menu, and check the Simulate Pressure box.


Hit Enter to get rid of the path.

Repeat this to create as many lines as you like.

Step 4:

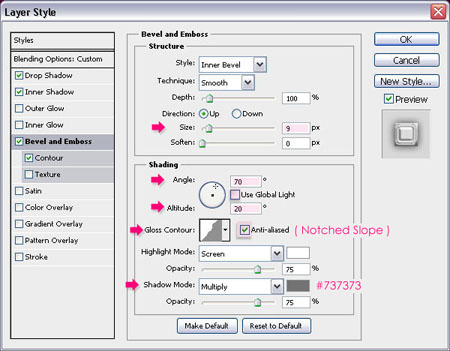
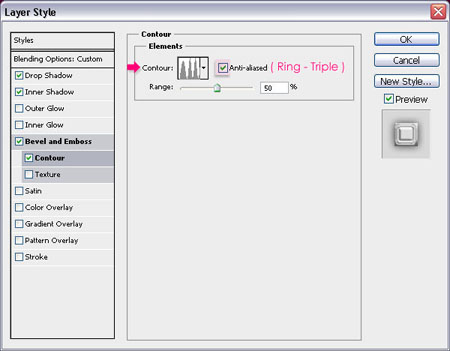
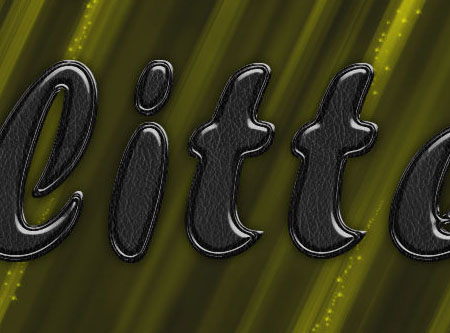
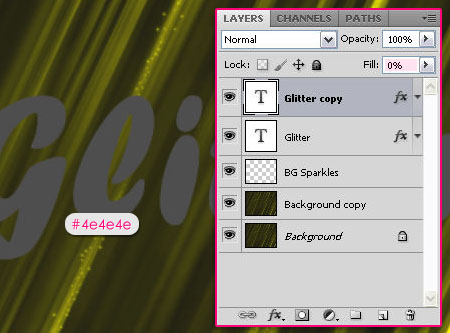
- Create your text using the color #4e4e4. The font used here is “Forte”, and the size is 300px. Once you’ve created your text, duplicate its layer, and change the copy’s Fill to 0.


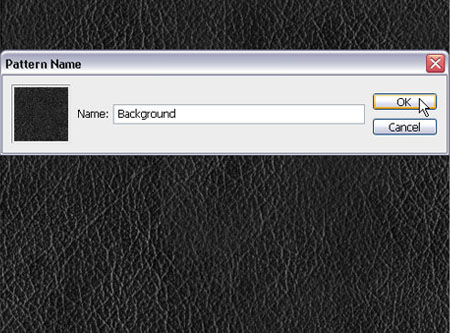
 This effect is based on the texture, which means the texture is important to get the “glitter” effect. So download this pack of 4 Free Leather Textures, and open the black one (number 2).

Go to Edit -> Define Pattern, and type the name you like for the pattern.


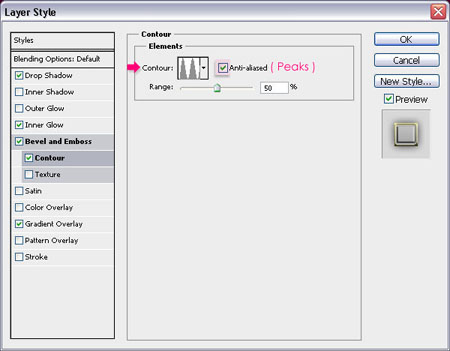
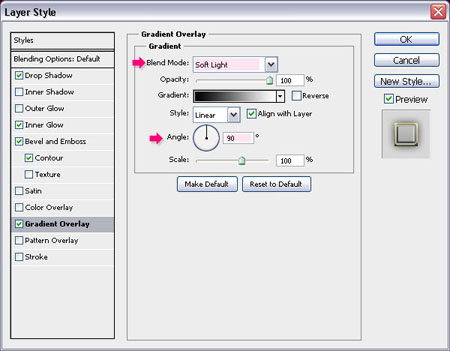
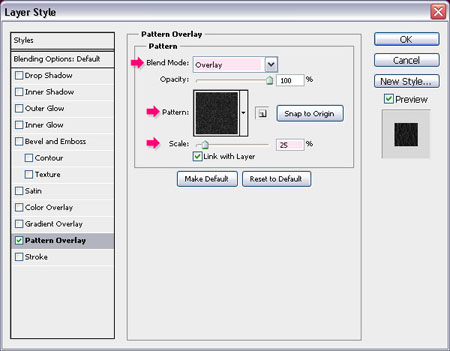
- Double click on the ORIGINAL text layer, and add a Pattern Overlay layer style. Change the Blend Mode to Overlay, choose the pattern from the drop down menu, and change the Scale to 25%.


Pages: 1 ... 75 76 77 78 79 [80] 81 82 83 84 85 ... 339